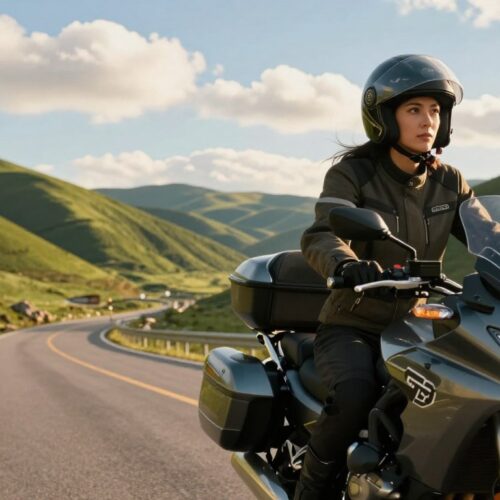
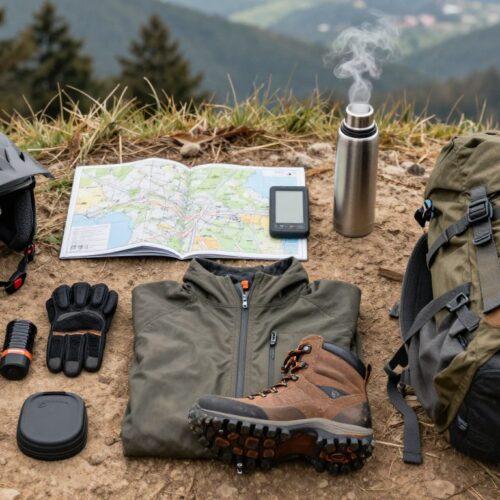
Before you hit the road, know that packing right is key. Your helmet is crucial — make sure it’s certified and has good ventilation. Also, get a riding jacket and pants that are padded, ventilated, and waterproof.
Don’t forget tools and maintenance items. A compact toolkit, tire repair kit, duct tape, and spare bulbs are must-haves. Also, carry a tire pressure gauge and a portable air compressor for quick fixes.
Documents and tech are also vital. Keep your license, registration, and insurance safe. Bring a GPS and physical maps, and a helmet intercom for safety. Test your electronics and carry spare batteries and memory cards.
Comfort and daily habits are important on long trips. Pack base layers, gloves, rain gear, and riding boots. Don’t forget hygiene items, sunscreen, and a first-aid kit. Use a mix of hard and soft bags for luggage, and secure them with Rok Straps or cargo nets.
Before you leave, do a pre-ride check and schedule service. Use the T-CLOCS routine for inspection. Tell friends or family your route.
Choosing the Right Motorcycle for Your Adventure
Your motorcycle choice affects what you pack for a trip. A touring bike offers storage and a smooth ride for long trips. An adventure bike is great for rough roads and can carry extra fuel and tools.
Choose luggage that fits your bike. Hard panniers work well on touring bikes with mounting points. Soft bags or tail bags are better for lighter bikes where balance is key. Make sure your bike can handle the weight of your gear.
Consider the terrain and how far you’ll go. For off-road adventures, choose a bike with good fuel range and easy maintenance. For coastal or interstate rides, focus on comfort and wind protection. This helps decide what extra items to pack.
Check your bike and get a professional service before you leave. Test new gear on a short ride to ensure it fits and balances well. This step helps avoid surprises and fine-tunes your packing list.
Use the chart below to compare typical strengths and packing implications for common road-trip bike types. The table helps you decide which items belong on your packing list motorcycle type and which accessories best match your motorcycle selection.
| Bike Type | Best For | Luggage Options | Packing Priorities | Maintenance Notes |
|---|---|---|---|---|
| Touring motorcycle (Harley Road King, BMW R1250RT) | Long highways, two-up comfort | Hard panniers, top cases, integrated mounts | Wind protection gear, full tool kit, rain covers | Scheduled servicing, heavy frame; easy access to storage |
| Adventure bike (KTM 790, Honda Africa Twin) | Mixed terrain, off-road capability | Hard panniers or soft luggage, tank bag | Extra fuel, travel stand, tire repair kit | Design for repairs in-field; carry spare tubes and basic tools |
| Cruiser / Standard (Yamaha Bolt, Indian Scout) | Shorter routes, relaxed riding | Tail bags, sissy bar bags, compact saddlebags | Lightweight packing, secure fastening, weatherproof covers | Simpler mechanics; watch weight and balance carefully |
Essential Gear for Comfort and Safety
When planning a long ride, focus on packing road trip essentials for protection. A DOT, SNELL, or ECE-certified full-face helmet is a must. It should have strong ventilation, noise control, an internal sun visor, and options for integrated comms and speakers.
Your riding jacket and pants need CE-rated armor at shoulders, elbows, hips, and knees. Choose materials that are good for ventilation and waterproofing. This keeps you comfortable in changing weather. A reflective vest is also helpful for low-light visibility.
Always wear ATGATT for every mile. This means a certified helmet, armored jacket and pants, gloves, and boots. On long routes, ATGATT reduces risk and prepares you for varied road conditions.
Gloves are important for grip and impact protection. Pack weather-specific pairs: ventilated textile for heat, insulated leather for cold, and a waterproof overglove for rain. Look for knuckle and palm armor and touchscreen-friendly fingertips.
CE-rated riding boots protect ankles and soles while giving support off the bike. They are useful when you stop for meals or a quick hike. Carry a helmet lock and spare visor or tinted visor for bright days.
Temperature control is key for comfort. Base layers, moisture-wicking shirts, and a heated vest or electric liner help you ride longer with less fatigue. Earplugs and eyewear, including contacts plus a backup pair of glasses, reduce distractions and eye strain.
Small safety accessories make a big difference. Pack spare bulbs, a compact emergency locator, cargo straps, and a travel stand. A helmet with integrated comms can replace separate devices while keeping your hands free.
Below is a prioritized head-to-toe checklist you can use before you mount up. These items reflect road trip essentials and must-have gear for serious riders.
| Category | Item | Why it matters |
|---|---|---|
| Head | Full-face helmet (DOT/SNELL/ECE) | Legal protection, impact safety, wind and bug shield, comms-ready |
| Torso | Armored riding jacket | CE armor, ventilation, waterproofing for changing conditions |
| Lower body | Armored riding pants | Impact protection for hips and knees, abrasion resistance |
| Hands | Armored gloves (weather-specific) | Knuckle/palm protection, grip, thermal or ventilated options |
| Feet | CE-rated riding boots | Ankle support, sole protection, off-bike comfort |
| Layers | Base layers and heated vest | Temperature control, moisture management |
| Rain & visibility | Rain suit and reflective vest | Waterproofing and increased visibility in low light |
| Small accessories | Earplugs, spare visor, helmet lock, cargo straps | Comfort, backup protection, gear security |
| Emergency items | Spare bulbs, emergency locator, travel stand | Preparedness for on-road issues and safe stops |
For quality picks, check established retailers and brands that specialize in motorcycle safety gear, such as Road Gearz and well-known manufacturers. Prioritize fit and certification before style so your must-have gear protects as intended.
Packing the Right Clothing
Begin with essential protective items. Choose a riding jacket and pants with CE-rated armor. They should also have ventilation and a waterproof membrane. A full-face helmet that fits well and gloves with protection for palms and knuckles are also key.
Think about layers for your trip. Start with moisture-wicking base layers. Then, add a breathable mid-layer like a fleece or thin insulated vest. Finally, include armored outer layers for safety. A lightweight heated vest is good for chilly nights.
Don’t forget rain gear that’s compact and reliable. A waterproof outer shell and overpants will keep you dry. Store wet items in a dry bag to keep your clothes clean.
Keep off-bike clothes simple with just one versatile set. Choose boots that are safe on the bike but okay for a diner. Use compression bags for socks and underwear to save space.
Remember to pack useful extras like spare contacts, sunglasses, earplugs, and a travel towel. Use bags for your helmet, boots, and wet gear to protect your expensive clothes.
Use smart packing tips that riders love. Roll clothes to save space and keep layers easy to access. Use Rok Straps or cargo nets for big items. Carry extra camera batteries instead of extra shirts to stay light.
Adopt the ATGATT mindset: all the gear, all the time. Quality motorcycle clothing makes long rides more comfortable and safe. Pack wisely for a smoother trip with fewer surprises.
Motorcycle Maintenance Tools and Supplies

Prepare a compact, prioritized packing list for routine checks and roadside repairs. Start with a compact multi-tool, metric and SAE wrenches, a set of screwdrivers, and pliers for quick adjustments.
Include a tire repair kit with plugs and patches plus a tire pressure gauge. Carry a mini air compressor or CO2 cartridges to reinflate tires after a plug. These items make basic roadside repairs fast and dependable.
Add spare parts that wear or fail often: fuses, bulbs, a chain master link, clutch and throttle cables, and a spare brake lever. Small electrical spares and extra bulbs prevent long delays when visibility or signals fail.
Bring duct tape, zip ties, Rok Straps, and a travel-friendly aluminum stand for changing or stabilizing a wheel. Pack a flashlight or headlamp with spare batteries and keep your owner’s manual in an easy-to-reach pocket.
Store everything securely in a hard pannier or a dedicated tool roll. Test each tool and the portable compressor before you ride. Tighten fasteners, confirm torque limits, and verify spare parts fit your model.
Schedule a professional checkup two to three weeks before departure for an oil change, fluid top-off, and a T-CLOCS inspection. Carrying the right motorcycle maintenance tools complements that service and reduces the chance of being stranded.
Use this concise packing list as your foundation. Add items specific to your bike and route, and keep the kit light, accessible, and well organized for true peace of mind on long trips.
Navigation and Communication Devices
Get a tough, weather-resistant GPS for motorcycles as your main guide. Garmin or TomTom GPS units fit handlebar mounts and work with gloves. They also resist rain. Pair it with a rugged phone mount for quick route changes.
Keep paper maps as a simple backup. They help if your GPS or phone battery runs out. A folded map shows you roads you might miss on a screen.
For talking to other riders, choose a helmet intercom from Cardo or Sena. It lets you talk to others, get directions, and make hands-free calls. This keeps you focused on the road.
For better group communication, consider a dedicated motorcycle device. These offer mesh or Bluetooth networks, music, and weather alerts.
Take an emergency locator like Garmin inReach or SPOT for remote areas. They send SOS messages and share your location when there’s no cell service.
Don’t forget charging gear: handlebar USB plugs, power banks, spare batteries, and a solar charger. Also, carry extra memory cards and a small toolkit for long rides.
Use a layered navigation plan: a primary GPS, a phone with offline maps, and paper maps. Choose a helmet intercom or device based on your group size and mission.
| Item | Best Use | Key Feature | Recommended Brands |
|---|---|---|---|
| Motorcycle GPS | Primary route guidance | Glove-friendly, weatherproof, handlebar mount | Garmin, TomTom |
| Phone with GPS app | Backup and quick updates | Offline maps, rugged mount | Apple, Samsung, Google Maps |
| Paper maps | Fail-safe navigation | No power needed, wide-area view | Rand McNally, National Geographic |
| Helmet intercom | Ride coordination | Hands-free calls, intercom for groups | Cardo, Sena |
| Motorcycle communication device | Advanced group comms | Mesh or multi-pair Bluetooth, music | Cardo, Sena |
| Emergency locator | Remote safety | SOS and satellite messaging | Garmin inReach, SPOT |
| Power solutions | Keep devices charged | USB outlet, power bank, solar | Anker, Goal Zero |
Hydration and Nutrition on the Road
Make staying hydrated easy on your motorcycle trip. Carry an insulated water reservoir or a stainless steel bottle in your tank bag. This way, you can drink while you’re stopped. Don’t forget to add electrolyte tablets to replace lost salts during hot rides.
Choosing the right food can prevent fatigue. Opt for compact, high-energy foods that stay fresh in the heat. Energy bars, mixed nuts, and beef jerky are great because they’re calorie-dense and don’t take up much space.
Choose snacks that are easy to eat during short breaks. Dried fruit, granola clusters, and single-serve nut butter pouches are perfect. They give you quick energy and are mess-free. Mix up your snacks to avoid getting bored with the same flavors every day.
Plan your food and snacks before you start your trip. If you have room, bring a small cooler for fresh fruit and sandwiches on longer rides. Don’t forget a compact coffee setup if you plan to camp.
Use a checklist to remember to drink and eat regularly. Take breaks every 60–90 minutes to drink, stretch, and check your energy levels. Watch for signs of dehydration like dizziness or dark urine.
Plan your fuel and food stops in advance. Treat food and water as essential items, especially on long stretches without services. Only carry extra fuel if it’s legal and practical for your bike.
Below is a compact packing guide to balance weight, convenience, and nutrition for multi-day rides.
| Category | Recommended Items | Why It Matters |
|---|---|---|
| Hydration | Insulated reservoir, stainless bottle, electrolyte tablets | Easy access to fluids prevents fatigue and heat stress |
| Quick Snacks | Energy bars, nuts, jerky, dried fruit | High calories in small packages keep you alert between meals |
| Meal Options | Pre-made sandwiches, hummus packs, vacuum-sealed tuna | Balanced meals restore energy and protein after long distances |
| Camping Extras | Compact stove, coffee kit, small cooler | Warm meals and caffeine boost morale on overnight stops |
| Storage & Access | Tank bag, dry bags, resealable pouches | Keeps food protected and reachable without unpacking |
| Emergency Supplies | Extra water, fuel-safe can, concentrated meals | Preparedness for long legs without services |
Shelter and Comfort for Overnight Stops
When planning your motorcycle trip, think about the route and what you need for comfort. For trips that mix city and country, a small 3-season tent and a sleeping bag for cold weather are good. Add a sleeping pad and a small pillow to make sleeping better without carrying too much.
For camping, don’t forget a small stove, light cookware, a headlamp, a quick-dry towel, and basic toiletries. Also, keep a travel stand and basic tools handy for remote stops or long rides without services.
If you prefer staying in guesthouses or motels, pack light. Bring a change of clothes, compact toiletries, and waterproof bags for wet gear. This setup is easy to carry and keeps you comfortable in towns and at motels.
How you pack is important. Use dry bags for your sleeping gear and keep it in an easy-to-reach pannier. Mix hard and soft luggage to balance weight. Place heavy items low and in the middle for better handling on twisty roads.
Plan your overnight stops with fuel and detours in mind. For long rides, consider a bigger gas tank or an extra can. Also, check service points before it gets dark. These steps help keep your shelter choices flexible and safe.
Here’s a quick guide to help you choose between camping and lodging kits. It compares them based on space, weight, and comfort.
| Option | Core Items | Pack Weight | Best Use |
|---|---|---|---|
| Camping kit | 3-season tent, sleeping bag, pad, stove, headlamp | 7–12 lbs | Remote overnight stops, wilderness routes |
| Lodging kit | Change of clothes, compact toiletries, waterproof bag | 2–4 lbs | Town-to-town touring, motel nights |
| Hybrid setup | Light tent, smaller stove, basic toiletries, balanced luggage | 5–8 lbs | Mixed routes with variable services |
Keep essentials like hygiene wipes, a repair kit, and layers for sleep close. Smart packing saves time at stops and keeps you ready for weather changes.
Practice loading and unloading before a long trip. This helps you decide what to leave out and what’s essential for your comfort.
Safety and First Aid Kits

Make sure you have a small first aid kit for your motorcycle. It should have things for cuts, scrapes, and common problems on the road. Include bandages, gauze, tape, wipes, ointment, and tweezers. Don’t forget pain relievers, antihistamines, a CPR mask, gloves, and burn gel for bigger issues.
Also, have a safety kit for mechanical and weather problems. Add a reflective vest, tire gauge, air compressor, spare bulbs, and a multi-tool. Include duct tape, a utility knife, rope, and a travel stand. Carry a fire extinguisher, flares or an LED beacon, an emergency poncho, and a blanket for cold or wet weather.
Include items that riders and medical experts suggest. Add more tape, dressings, and a personal medication checklist. Keep insurance cards, emergency contacts, and club memberships in a waterproof pouch.
Learn basic first aid and CPR so you can use your kit well. Store your supplies in a labeled pouch on the bike or in a top case. Replace anything used or expired after each trip.
Use the table below to compare items and pick what fits your trip and skill level.
| Item Category | Essential Contents | Why It Matters |
|---|---|---|
| First aid kit | Adhesive bandages, sterile gauze, antiseptic wipes, antibiotic ointment, pain relievers, antihistamines, CPR mask, gloves | Treats wounds, reduces infection risk, manages allergic reactions and pain on the road |
| Emergency medical kit | Sterile dressings, adhesive tape, tweezers, scissors, burn gel, blister care, personal meds | Handles larger injuries and common medical issues when help is far away |
| Safety kit | Reflective vest, flares/LED beacon, compact fire extinguisher, rope, duct tape, multi-tool, utility knife | Improves visibility, controls minor hazards, and enables quick roadside fixes |
| Mechanical backup | Tire gauge, portable air compressor, spare bulbs, travel stand, basic toolkit, spare fuses | Prevents small breakdowns from turning into long delays |
| Extras & documentation | Emergency blanket, poncho, paper map, insurance card, AAA or club membership card, emergency contact list | Provides shelter, navigation backup, and quick access to help or roadside assistance |
Planning Your Route and Stops
Begin by picking a main route and a backup plan. Use GPS and a map to check road types and services. Plan stops for fuel, food, and sightseeing to avoid long drives and miss out on attractions.
Set daily mileage goals based on your comfort and skill. Take breaks every 60–90 minutes to stretch and drink water. Book your lodging in advance, especially on busy roads or in remote areas, to reduce stress.
Book a professional bike inspection two to three weeks before your trip. Get an oil change and fill up on fluids to allow time for repairs. Reset your trip meter after service to track your journey accurately.
Do a T-CLOCS inspection every morning before riding. Check tires, controls, lights, oil, chassis, and stands. A quick check can catch small problems before they grow.
Test your accessories and must-have gear on short rides before long trips. Make sure phone mounts, heated liners, and luggage work well. Carry spare bulbs, a multi-tool, and a tire repair kit for emergencies.
Plan extra supplies for remote travel. Reserve fuel, bring spare parts, and carry an emergency beacon like a Garmin inReach. Map out offline resources and service stations along your route.
Tell friends or family about your trip plan and estimated arrival times. Share GPX files or simple maps so they can track your journey. Include any detours or border crossing plans.
Do a short test ride before you leave. Check your luggage, suspension, and fuel range. Use this ride to adjust your packing list and ensure you have the right gear for comfort and safety.
Here’s a checklist to finish your planning: choose routes, plan fuel stops, set daily goals and breaks, book lodging, get a bike service, do a T-CLOCS inspection, tell contacts, test gear, and pack for emergencies and remote travel.
Budgeting for Your Motorcycle Road Trip
First, make a list of what you think you’ll spend on your trip. Include things like fuel, where you’ll stay, food, and any bike repairs. Don’t forget to save a little for emergencies.
Split your costs into daily and one-time expenses. Daily costs help you figure out how much you’ll spend each day. One-time costs are for things like new tires or a new helmet. This way, you can plan your budget better.
Make a table to compare costs. Use average prices for fuel, motels, and bike parts. This helps you find ways to save money, like staying in campsites and motels.
| Category | Typical Cost Range (per day) | Notes |
|---|---|---|
| Fuel | $25–$60 | Depends on mileage and bike efficiency |
| Lodging / Camping | $10–$90 | Campground fees lower cost; motels cost more |
| Food | $15–$45 | Cook meals when possible to save |
| Maintenance & Parts | $5–$30 | Pre-ride service reduces breakdown risk |
| Gear Purchases | $0–$300 | Buy only essentials to meet your packing list budget |
| Insurance / Permits | $0–$50 | Check state fees and temporary permits |
| Emergency Fund | $100–$500 | For towing, unexpected repairs, or medical needs |
Get your bike ready before you leave. A tune-up and the right tire pressure can save you from big problems. Keep a small tool kit and spare parts in your bike to avoid extra service calls.
Sign up for roadside help like AAA. It can save you money on tows and other emergencies. This helps keep your trip costs down.
Choose your luggage wisely. Hard cases are heavier and more expensive. Soft luggage is lighter and cheaper, and can save you money if you need to send extra gear.
Use cash for small things and credit cards for big ones. Keep track of your spending with an app or a notebook. This helps you stay on budget.
Plan your fuel stops carefully. Look for gas stations along your route and choose places with free parking for bikes. This can save you money and avoid emergencies.
Save money in small ways. Do your own repairs, carry less gear, and mix camping with motels. These tips help you stay within your budget while still enjoying your trip.
Connectivity and Entertainment Options
For long rides, you need reliable connectivity. Choose Bluetooth intercoms or helmet speakers from brands like Cardo and Sena. They let you connect to directions, make calls, and stream music or podcasts without taking your eyes off the road.
Carry a phone with offline maps and a dedicated GPS for your bike. Garmin devices are great for tough navigation and saving waypoints. Download routes and playlists before you lose cell service. Also, consider a satellite communicator like Garmin inReach or SPOT for remote areas and emergencies.
Plan your electronics with power and backup in mind. Pack portable power banks, extra charging cables, and a USB port for your bike. Bring extra SD cards and camera batteries for scenic stops. Keep a small kit with chargers, a multi-port adapter, and cable ties to manage your cords.
Choose helmet intercoms that support multi-rider chats and GPS audio. These often include weather and traffic alerts for safer group rides. Test the voice prompts and audio levels before riding to ensure clear sound at speed.
Use weather apps and route alerts to adjust your plans. Download important apps, sync contacts for emergencies, and save offline maps and local services. This mix of tools meets your basic needs and boosts your confidence on long trips.
Here’s a quick checklist for smart packing.
- Helmet intercom or Bluetooth headset (Cardo PACKTALK, Sena)
- Phone with offline maps and a dedicated motorcycle GPS
- Portable power bank and spare charging cables
- SD cards and spare camera batteries
- USB charging ports for the bike and a multi-port adapter
- Optional satellite communicator (Garmin inReach, SPOT)
Essential Riding Skills for Long Distances

For a multi-day trip, it’s more important to have practical riding skills than fancy upgrades. Start by learning how to do pre-ride checks. A daily T-CLOCS inspection ensures your tire pressure, controls, lights, oil, chassis, and stand are all in order. Make this a habit by using a trusted pre-ride checklist at pre-ride checkup.
Before you leave, practice basic roadside repairs. Learn to plug a tire, adjust a chain, swap a bulb or fuse, and tighten loose fasteners. Carry a compact toolkit and items like Rok Straps or cargo nets for securement. Test mounts and luggage on a loaded bike to ensure your packing list skills are up to par.
Group riding requires clear communication and safe spacing. Agree on hand signals and intercom etiquette, keep steady intervals, and rotate lead responsibilities. Plan your route to avoid long detours that waste time and energy. Scout fuel stops and plan breaks around services and scenery.
Fatigue management is key to a good ride. Schedule frequent stops, stay hydrated, eat light meals, and stretch. Sleep well before long days and adjust your pace to the conditions. Light packing helps you stay alert and focused.
Train with your full load to handle surprises on the tour. Practice mounting and dismounting with luggage, load weight low and centered, and check fasteners after the first miles. Take a basic motorcycle maintenance or first-aid course to build confidence in roadside fixes and emergency response.
Combine these skills into a short checklist for each morning: T-CLOCS inspection, secure luggage check, tire and chain spot-check, hydration top-up, and a final gear fit test. These small steps make long days safer and more enjoyable, keeping your motorcycle road trip essentials within easy reach.
Understanding Local Laws and Regulations
Before you hit the road, check the motorcycle laws in your state and local area. These laws cover helmets, lighting, and protective gear. Each state has its own rules, so make sure you know if helmets are required and what kind of eye protection or gloves are legal.
Always carry your driver’s license, registration, and insurance card. Keep digital copies on your phone and a printed copy in your luggage. These documents are essential for passing traffic stops and checkpoints.
Make sure your motorcycle trip insurance covers you across state lines and in Canada or Mexico if needed. Call your insurance company to confirm roadside assistance and liability limits before crossing a border.
Include roadside assistance cards from services like AAA in your pack. Also, keep emergency contact and medical information in an easy-to-find spot. This is a crucial legal step for any road trip.
If you’re planning to ride across multiple states or internationally, research the necessary permits and customs paperwork early. Some routes require special bike documentation or temporary import permits. Plan for extra time at borders.
Learn the local traffic rules for each area you’ll visit. This includes speed limits, lane-splitting policies, and parking rules. Knowing these can help avoid fines and keep your ride safe.
Ensure your bike meets local standards for mirrors, turn signals, and emissions. A quick check before you leave can help avoid getting a ticket that ruins your plans.
Organize a folder with all your important documents, both physical and digital. Keep a copy of the owner’s manual on the bike for easy access. Staying organized helps you stay focused on the road.
Preparing for the Unexpected
Always carry a compact toolkit and a tire repair kit for unexpected breakdowns. Make sure to include spare bulbs, fuses, and cables. A portable air compressor is also essential. Use Rok Straps or similar cargo ties to keep your gear secure.
Don’t forget a safety kit with flares, a fire extinguisher, and duct tape. Add a utility knife, rope, and an emergency poncho. A travel stand and spare belts are useful for remote routes. These items help avoid being stranded.
Plan your backup plans before you leave. Consider joining AAA or a manufacturer’s roadside assistance program. Carry extra cash, a paper map, and copies of your registration and insurance. Store digital copies in the cloud and offline on a locked device.
Bring a GPS emergency locator like Garmin inReach or SPOT. Also, consider helmet comms for short-range voice contact. Program emergency contacts into your phone and comms system. Set a check-in schedule with family or riding partners.
Service your bike with a T-CLOCS inspection and a professional check before long trips. Replace worn tires, test brakes, and confirm fluid levels. A well-serviced bike lowers the odds of unexpected breakdowns and keeps you safer on long rides.
Follow this step-by-step emergency preparedness plan:
- Pack comprehensive toolkit and safety kit.
- Carry spare parts, bulbs, and a portable compressor.
- Bring a satellite or GPS emergency locator (Garmin inReach, SPOT).
- Purchase roadside assistance and understand the coverage.
- Keep physical maps, extra cash, and paper documents.
- Store digital documents in cloud and offline; program emergency numbers.
- Agree on a check-in schedule with your riding group.
Below is a practical checklist to print and use before every trip. Use it to balance light packing with smart redundancies. This makes your motorcycle road trip essentials easy to manage.
| Item | Purpose | Recommended Brand or Example |
|---|---|---|
| Toolkit | Field repairs and adjustments | Metric wrench set, Leatherman multitool |
| Tire repair kit & compressor | Fix flats and reinflate tires | Slime kit, VIAIR portable compressor |
| Spare parts | Quick replacements to avoid delays | Bulbs, fuses, cables, spare belt |
| Emergency locator | Send SOS and share coordinates | Garmin inReach, SPOT Gen4 |
| Roadside assistance | Towing and recovery support | AAA motorcycle membership or manufacturer plan |
| Safety kit | Protect and signal at incidents | Flares, fire extinguisher, duct tape |
| Communication | Stay in touch with riders and family | Sena or Cardo helmet comms, phone with emergency numbers |
| Documents & cash | Proof and payment when electronics fail | Paper map, printed insurance, $100 in small bills |
Eco-Friendly Practices for Bikers
You can make your ride kinder to the planet without losing comfort or safety. Start with a green packing list that replaces single-use items with durable gear. Pack a refillable water bottle, stainless steel utensils, and silicone toiletry containers to cut waste on the road.
Choose motorcycle road trip essentials that are repairable and long-lasting. A compact tool kit from brands like Park Tool and a durable tire repair kit reduce the chance of tossing disposable parts. Lighter, smarter packing lowers weight and improves fuel efficiency for a more sustainable road trip.
Plan routes to avoid needless detours and idling in traffic. Efficient routing saves fuel and time, which helps your eco-friendly motorcycle efforts. Use a mix of hard and soft luggage so you carry only what you need and reduce bulk.
When camping, follow Leave No Trace practices. Use biodegradable soap, pack out trash, and prefer eco-friendly camping products like a solar charger and low-impact stove. Supporting local businesses for food and supplies helps local economies while cutting long supply chains.
Dispose of repair materials and used fluids responsibly. Keep a small sealable container for oily rags and used patches. Take these to proper recycling or hazardous-waste facilities rather than leaving them at rest stops.
Use the green packing list to audit what you bring. Prioritize multi-use clothing, reusable containers, and lightweight shelter. That checklist will keep you organized, lighten your bike, and reinforce a sustainable road trip mindset.
Small choices add up. Pack smarter, plan tighter routes, choose durable gear, and leave campsites as you found them. These habits make your motorcycle road trip essentials serve the journey and the environment at once.
Conclusion: Ready for Your Biker Adventure
Planning well and having a good packing list make your ride amazing. Before you hit the road, get a bike check-up and do T-CLOCS inspections. This ensures your bike is ready and safe.
Make sure you have all the essentials: a helmet with comms, armored clothes, a toolkit, spare bulbs, and an emergency locator. Test these items on a short ride to make sure they work.
Pack your gear wisely, balancing weight and securing it with cargo straps. Use a travel stand if needed. Don’t forget navigation tools like a GPS and paper maps, helmet intercoms, power banks, and snacks. Also, carry a first-aid and safety kit.
Keep important documents and roadside assistance info with you. This way, you can handle any paperwork easily without stress.
For long trips, carry extra fuses, basic spare parts, and tested comms. Tell someone your travel plans, rest well before you go, and plan breaks. With this list and the right attitude, you’ll ride safely and enjoy the journey.