You need to know when small noises or vibration signal a big safety issue. Proper service keeps your ride smooth and prevents hazards like hub seizure or sudden lock-up. This guide shows how to spot failure, run quick checks, and decide if you can keep riding or must stop for repair.
In plain terms, these rollers cut friction so hubs spin freely. Neglect can turn a minor hiss into handling problems or worse.
Expect practical steps: remove the wheel, pull seals and clips, drive out old parts, clean the hub, and press in new races correctly. I flag common errors, such as mistaking pad drag for noise, or crushing a new unit against a spacer.
Time and cost notes help you choose between a DIY job and a shop visit. Follow your owner’s manual for torque and model specifics; this article gives the what and why, not exact torque numbers.
What Motorcycle Wheel Bearings Do and Why They Matter
A set of rolling elements and races lets the hub rotate freely while carrying the bike’s weight. You rely on these small parts every time you ride, and their job is simple: cut friction and carry load so your wheels turn true.

How they reduce friction
Inside the hub, an inner race and an outer race hold the balls that roll between them. That rolling action replaces sliding contact and keeps heat and drag low.
Why seals and oil matter
Seals and oil seals keep water and dirt out and grease in. When a seal fails, grease washes away, contaminants enter, and corrosion starts.
- You’ll feel roughness or a gritty roll as drag increases.
- Humming or harsh vibration at the handlebars can point to worn races.
- Brake pad drag can hide the issue; bearing noise feels inconsistent as you spin the wheel.
Small parts, big risk: a worn bearing is cheap to fix but can damage the hub or cause a locked wheel. Check by feel before you grab tools.
How Long Wheel Bearings Usually Last on a Motorcycle
When seals hold and grease stays clean, these parts often outlive the rest of the hub. In many cases, well-maintained units can run 100,000 miles or more before you need service.

Why long life is normal
Sealed designs keep contaminants out and usually need no service until they show symptoms. Open designs wear faster if not repacked with quality grease that meets NLGI GC-LB specs.
Riding that shortens life
Frequent water crossings, pressure washing that blows out grease, gritty roads, off-road impacts, and repeated hard landings all shorten service life.
- Contamination causes abrasive wear and corrosion.
- Impacts can cause brinelling or pitting in the races, leading to rapid noise and damage.
- Grease condition matters more than mileage alone; dirty or lost lubricant speeds failure.
Bottom line: use mileage as a guideline, but let symptoms and inspection drive the timing of any service.
When to Replace Motorcycle Wheel Bearings
Catch early signs of failure—small play or a faint knock means you should act fast. If a play check shows side-to-side movement or you feel gritty rotation, plan to replace motorcycle wheel components right away. Waiting lets clearance grow and heat rise, which damages the hub and costs more to fix.
- Replace now for any detectable play, persistent knock, or roughness when the wheel is unloaded.
- Replace if you suspect water intrusion, blown-out grease from pressure washing, or deep-water rides—corrosion can hide inside before noise appears.
- Replace after heavy impacts (potholes, hard landings, off-road hits) even if noise is not yet obvious; races can dent and cause future failure.
Practical note: grease loss or damaged seals and a compromised spacer mean one new part rarely fixes the problem. Plan to replace the full bearing set plus seals and inspect oil-retaining surfaces.
For DIY work you may use a drift and hammer to remove parts, but use correct technique. Driving the outer race only and avoiding hub damage matters more than speed.
Symptoms of Worn or Damaged Wheel Bearings
A subtle tug or wandering feeling while you ride is a key early sign that parts inside the hub need attention. Catching symptoms early helps you avoid bigger damage and costly repairs.
Vague handling and wandering
Worn bearings make steering feel loose or “wandery,” especially at speed. The front no longer tracks true on the axle, so turns feel soft.
Harsh vibrations at the handlebars
Rough rotation shows up as vibrations. Tires, spokes, or alignment can mimic this, so check those first.
Humming or unusual noise
Noise alone is the least reliable clue. To avoid misdiagnosis, listen for consistent roughness at the hub while you spin the tire by hand.
Rear wobble and overheating brakes
- A rear wheel wobble can feel like a flat or a loose axle nut even when pressure and fasteners are OK.
- Added friction from a dragging unit can heat brake discs quickly after short rides.
Make sure you don’t ignore combined signs—noise plus heat plus play is a stronger indicator than any single symptom. Next, follow inspection steps to confirm before ordering parts.
Common Causes of Premature Bearing Damage
Small contaminants and shock loads shorten service life far faster than mileage suggests. You should watch for easy-to-fix habits that cause early damage. Fixing behavior saves time and money.
Pressure washing, dirt, and moisture
A high-pressure wash near the axle can force water past seals and push grease out. Once grease is gone, corrosion and grit set in quickly.
Dirt mixed with remaining lubricant turns into an abrasive paste that wears races and rollers. Moisture promotes rust that hides under the seal.
Aggressive riding and impacts
Hard landings, off-road hits, and sustained wheelies put repeated shock loads through the hub. Those shocks can dent races and start a failure you feel later.
Installation, quality, and overloading
- Pressing a bearing in the wrong spot, misalignment, or skipping lubrication on open units causes immediate internal damage.
- Low-quality bearings may lack proper sealing or heat tolerance and fail under normal stress.
- Heavy luggage raises continuous load on the rear and increases heat at highway speeds.
Prevention: wash carefully, use quality parts, follow correct install steps, and limit cargo. These simple steps cut how often you must service bearings.
How to Inspect Wheel Bearings Before You Replace Them
A few safe checks with the wheel off the ground separate brake feel from true hub problems. Set the bike on a solid stand so the rim turns freely and the frame cannot move. Make sure the bike is stable before you start.
Spin test
Rotate the rim slowly by hand. Feel for grit, notches, or rough spots. Light, steady resistance from the brake pads is normal. Irregular grittiness or vibration through the hub points to worn bearings.
Rock test
Grip the top and bottom of the tire and try to rock it. Any knock or side-to-side play means the races or rollers are compromised.
Rotate the rim about 180° and repeat the rock test to catch wear that shows only in certain positions.
Quick decision rules
- If you detect any movement at the top or bottom, plan to replace the worn parts rather than wait.
- If the spin feels uneven or gritty beyond consistent pad drag, order new wheel bearings and inspect seals and spacers.
- When in doubt, consult a shop—testing is quick and prevents bigger damage.
Parts and Supplies to Gather for the Job
A clean parts list up front saves you time and keeps the job from stalling on the stand. Collect parts before you begin so the bike sits on the lift only once.
Always plan to install new bearings as a set for each wheel. If one side shows wear, the opposite side has seen the same miles and contamination risk. Replacing both sides prevents repeat work and uneven load on the hub.
Seals, dust seals, and the spacer
Order fresh seals and dust seals every time. Pulling the old seals usually deforms them, and reusing them invites water and grit back into the hub.
Inspect the spacer for scoring, flattening, or length changes. If the spacer shows wear or corrosion, replace it; an incorrect spacer length can preload the new parts improperly.
Sealed vs open designs and grease
Choose sealed units if you prefer low maintenance. Open designs require packing with grease that meets NLGI GC-LB. GC covers high-temp wheel use, and LB protects chassis components exposed to water and contaminants.
- Order OEM-equivalent kits or trusted-brand new bearings to avoid cheap parts that fail early.
- Include new seals, any circlips, and the correct spacer in your parts list.
- Get NLGI GC-LB rated grease and a small tube of light oil for seal lips if needed.
Tools You’ll Need for a Clean, Safe Bearing Swap
Gather the right kit before you start so the job stays tidy and you avoid damage. A short checklist saves trips to the store and cuts overall time on the stand.
Basic removal and support gear
Bring a hammer and a matched drift for driving out the old race. Use wood blocks to support the rim and protect the brake rotor while the wheel is off the bike.
Installing without harm
Use a socket sized to press only the outer race when you install new units. Driving on the outer race prevents loading the inner parts and stops premature damage to the race.
Seal care and optional helpers
A proper seal puller beats a flat-bladed screwdriver for removing seals. Gouging the seal housing is a common cause of leaks and repeat failure.
- Keep circlip pliers handy—some models hide a clip under the dust seal.
- Optional: a hot air gun warms the hub slightly to ease pressing in, and chilling new bearings in a freezer can help them seat.
- Check dust seals and spacers before you reassemble; parts vary by model so confirm fit.
Quick mobile note: format your DIY checklist for width device-width so steps read clearly on a phone in the garage.
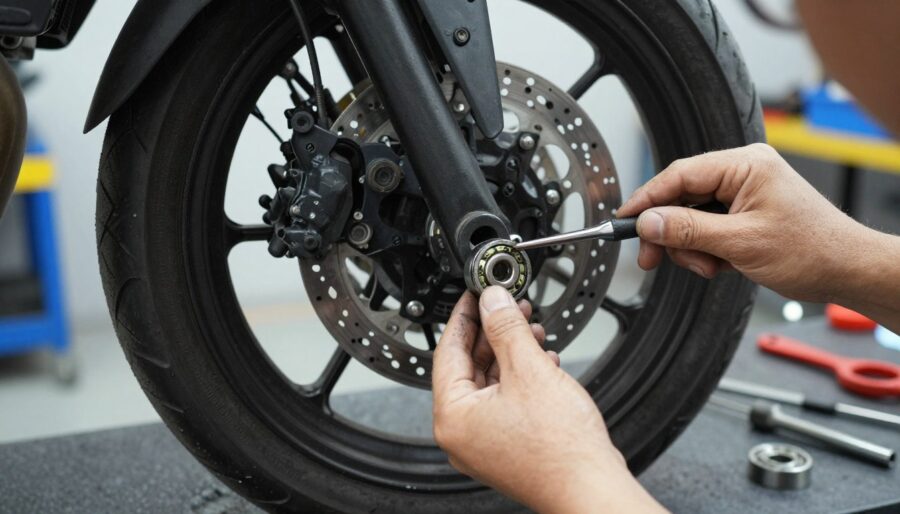
Motorcycle Wheel Bearing Replacement
Begin by removing calipers and supporting the rim so the brake disc never contacts the bench while you work. Place wood blocks under the rim to protect the rotor and give you room to use a drift and socket without bending parts.
Remove dust seals and check for circlips. Use a seal puller when possible; a flat screwdriver only if you must. Wipe away grease so you can see any circlip before you try pliers.
Drive the first part out by catching the inner ring edge with a long drift and working around the circumference. The spacer often frees as the first part walks out; flip the wheel and repeat the same alternating pattern for the second side to avoid cocking the race.
Clean the hub seats and circlip grooves of dirt and grime and inspect for corrosion or scoring. If an inner race has collapsed, use an old flared spindle to get behind the shell and apply careful heat to expand the hub if needed.
Install the first new unit straight, striking only the outer race with a socket sized to the race face. Seat the spacer, then install the second unit until it contacts the spacer—stop before crushing it. Pack open units with grease and press seals in with the open side facing the part.
- Rear note: replace the sprocket carrier drive bearing and track spacers/cush parts.
- Final check: make sure no grease or oil contacts brake discs or pads and follow your manual for axle torque and caliper mounting.
Time, Cost, and Safety Considerations Before You Ride
Plan your shop time and a realistic DIY window before you lift the bike off the stand. A clear schedule saves rushed work and prevents mistakes. Allow extra time for inspection, cleaning, and stubborn parts that add minutes to the job.
Typical DIY time vs shop time
For an experienced DIYer, a front wheel job often takes about 30–60 minutes. Time depends on access and experience.
The rear job usually takes longer because the sprocket carrier and extra units add steps. Stuck circlips, corroded bores, or collapsed races increase time further.
Expected cost range in the United States
Shops commonly charge about $300–$400 for parts and labor on a single wheel service. If you do it yourself, expect parts-only costs near $15–$70 depending on sealed or open sets.
Buying a few specialty tools is a one-time expense that saves time on future jobs and reduces risk to the hub.
Why it’s unsafe to ride with damaged parts
Riding with worn bearings can progress from noise and play to overheating and sudden lock-up. That creates a real crash risk.
Before you ride, make sure fasteners are torqued per your manual, brakes are clean, and the wheel spins smoothly without play.
- Set realistic time expectations and include cleanup.
- Prioritize proper tools to protect the hub and save time later.
- If in doubt, have a shop check it—safety is worth the cost.
Conclusion
A quick inspection today can stop a costly failure and keep your ride safe tomorrow.
Good seals and clean grease let bearings last up to about 100,000 miles. Water, pressure washing, and impacts cut that life fast.
Use the spin test and the rock test during routine checks so you catch roughness or play early. If you find any movement, plan to replace motorcycle parts rather than risk more damage.
Always install new units as a set, fit fresh seals, and press on the outer race only. Keep grease off brakes and follow your service manual for torque and order.
Don’t ride if you suspect trouble. The risk includes overheating or sudden lock-up, so get it inspected and fixed before you go.