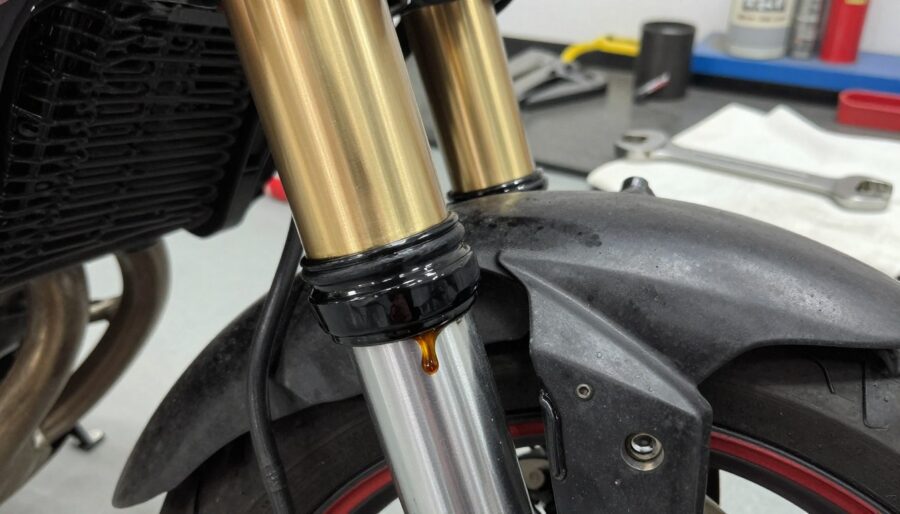
You found a trace of oil on the tube and wanted to know if it was a simple cleanup or a full service job. Small seepage often grew worse over time and could turn your suspension into a bouncy mess with poor damping. That also risked soaking your front brake pads, creating an immediate safety issue and extra cost.
In this guide you would first diagnose the symptom, then decide between a quick clean or a seal replacement and oil service. You would learn simple checks you could do at home with basic tools, and when a shop job made more sense.
The article used consistent terms like fork tube, dust seal, oil seal, and fork oil so you did not misdiagnose the source of oil. You were shown why ignoring the problem usually raised both risk and cost, since seepage often progressed to a larger leak.
By the end you would know how to spot symptoms, try non-invasive fixes, and recognize when replacement was the only reliable fix. Success looked like a clean, dry leg after a short ride, stable damping, and brakes free of contamination.
Key takeaways: diagnose first, try simple cleaning if suitable, prioritize safety, replace seals and oil when needed.
Spotting a Fork Oil Leak Early and Why You Shouldn’t Ignore It
Small wet streaks and trapped dust can be the first clues that oil is escaping. Catching this early lets you take simple action before handling or braking gets compromised.

Oil on the tube, grime rings, and puddles
Look for a thin film on the tube and a sticky band where dust clings. That ring forms because oil attracts dirt and holds it at the seal area.
A definitive sign is a small puddle under the forks after you park, or fresh drips after a short ride.
How handling changes — the “pogo stick” effect
As oil volume drops, damping fades and the suspension can feel bouncy and vague. You may notice poor control under braking and a twitchy front end.
Brake pad contamination and immediate safety risks
Leaked fluid can migrate to the brake area and soak the pads. That reduces stopping power and is dangerous in traffic.
- Earliest tells: wet film, grime ring, wet streaks.
- Distinguish from road grime: oil looks wet and returns after wiping; dirt sticks in a band.
- Obvious signs: puddle under the forks or visible drips after riding.
What to do right now: stop, wipe the tube clean, ride a short distance, then re-inspect for fresh oil. Avoid aggressive riding and heavy braking until you confirm the source.
Don’t delay; a small seep often grew worse with use. To fix it correctly, you needed to understand how the seal lip and sliding surfaces keep fork oil inside.
How Fork Seals Work and What Keeps Fork Oil Inside
A precision contact between the inner and outer tubes and a small rubber lip is what stops oil from escaping. That rubber lip is the working oil seal; it rides the polished tube surface and keeps fluid contained while the assembly moves.

The basic architecture: oil lives between the inner and outer tube, behind the dust cover. The dust seal keeps grit out, but the thin oil seal is the part that actually holds fluid in place.
The seal lip and its job
The flexible lip slides on the tube and must maintain a tight, even contact through travel. Its job is simple: stop oil, yet allow smooth movement.
Why wear happens over time
Constant sliding creates friction and heat. Hard impacts and quick compression raise internal pressure. Together, these stresses age the material and invite failure.
- Contamination can hold the lip open, letting oil pass.
- Worn or hardened material loses the precise fit it needs.
- Tube damage—pits or rust—breaks the smooth surface the lip rides on.
When you inspect, think in two failure modes: grit forcing the lip open, or worn components that no longer meet precisely. That helps you pick the right repair path.
Common Causes of a Motorcycle Fork Seal Leak
Most problems begin when external grit bypasses the outer dust lip and wedges under the working edge. That trapped material holds the contact open and lets fluid weep out slowly.
- Dirt, sand, and brake dust that get past the dust cover and lodge under the sealing lip, causing steady seepage.
- Normal wear and age: seals harden over years of heat cycles, and long storage can dry them so they no longer press evenly on the tube.
- Small nicks, pits or rust on the tube surface that create sharp edges and cut the rubber, allowing oil to pass.
- Scuffed coatings (including gold or titanium finishes) that raise friction and speed wear at the contact surface.
- Contaminated oil carrying metal particles acts like “liquid sandpaper,” abrading bushings and seals without a filter to catch debris.
Other factors: tying the front end down for long transport compresses the assembly and strains the seals. Also, routine riding alone produces heat and cycles that wear parts; sometimes nothing dramatic caused the failure.
Practical takeaway: debris-only issues may clean up; pitting, coating loss, or dirty oil usually mean a full service and replacement are the right call.
Quick Diagnosis Before You Decide to Repair or Replace
A fast, methodical diagnosis saves you from unnecessary repair costs and repeat work. Start by cleaning the entire lower leg and the sliding tube so you can spot fresh fluid paths after a short ride.
Confirm where the oil is coming from
Wipe the tube and the area under the dust lip thoroughly. Ride a short distance and recheck for new tracks.
Check the tube surface where the seal rides
Gently run a clean fingertip or a fingernail around the travel area. Feel for nicks, pitting, or rough spots that will cut a new part during installation.
Pattern clues that mean more than debris
- One leg weeping more than the other.
- Oil returning immediately after wiping.
- Rapid seepage after a brief ride.
If a new part leaked right away, suspect installation damage or a sharp edge on the tube rather than a bad brand. If you lack measuring tools or experience, have a shop inspect the components before you repeat the job.
When the tube is smooth and the issue is minor, try a cleaning fix. If damage or heavy, recurring leaking shows up, plan a full fork seal replacement and related service.
How to Fix a Leaky Fork Seal Without Full Seal Replacement
Sometimes the fix was a few careful minutes of cleaning rather than a full service. Start with the least invasive option and work only as far as needed.
Lift the dust lip and clean carefully
Gently lift the dust cover and use a lint-free cloth or cotton swab to wipe under the edge. Your goal is to remove grit that held the working lip open so the fork seal can re-seat.
The film field trick and its drawback
A common field trick is to slide a thin strip of flexible film under the edge and sweep around the tube. This film method can catch abrasive particles fast.
Be aware: the film approach sometimes pushed contamination inward, where it could harm bushings and damping parts.
Use a Seal Doctor–style tool when possible
A Seal Doctor–style device is designed to pull debris out instead of forcing it deeper. Insert it under the lip and rotate to extract trapped material gently.
Post-repair checks
- Wipe down the tube completely.
- Ride a short test for a few minutes, then re-inspect for fresh wetness.
- If seepage returns quickly, plan a full replacement and a closer inspection of tube damage.
When to Do a Fork Seal Replacement (and What Else to Service)
Deciding when to replace worn seals is about clear triggers, not guesswork. If cleaning didn’t stop the problem, if oil loss is rapid, or if the issue returns after a short ride, you should plan a proper fork seal replacement.
Timing depends on use. Off-road riding often wears parts fast; many riders change seals near the 40‑hour mark. Low‑use bikes benefit from changing oil and seals every two years to avoid dried-out rubber.
Why change the oil at the same time
There is no filter in the system. Contaminated fork oil circulates metal particles and grit. That “liquid sandpaper” accelerates wear on bushings and new seals.
Inspect adjacent parts before assembly
Check bushings, sliders, and tube alignment. Worn bushings let the tube rock and can shred a new seal quickly. Light nicks may be buffed in a crosshatch pattern, but pitting or coating loss usually needs professional re‑chroming or recoating.
DIY vs shop and cost expectations
DIY saves labor but needs specialty tools and careful technique; a bad install can nick the new seal lip and ruin the job. Many riders hear estimates around $100–$200, depending on parts, oil, and any extra work a shop finds.
- Decision triggers: cleaning fails, rapid oil loss, or repeat wetness.
- Timing: ~40 hours for off‑road; ~2 years for low use.
- Inspect: bushings, slider wear, tube surface before sealing.
Conclusion
When the front end feels softer and you see damp streaks, it’s time to act. If the issue was minor and grit caused the wetness, a careful clean under the dust lip or a seal‑cleaning tool is often the fastest way back on the road.
If dampness returned quickly, if oil soaked the pads, or if you found pitting or rust on the tube, plan a full replacement and fresh oil service. Treat pad contamination as urgent — braking performance can fall fast.
Keep your bike clean, avoid driving conditions that grind grit into contact areas, and don’t haul the vehicle compressed for long stretches. After any fix, make sure you wipe down, take a short test ride, and re‑inspect for a truly dry tube.
If you saw coating damage or immediate problems after a DIY job, get a professional inspection to avoid repeating the same failure.